Welcome to Teach Write! This column draws on my 20 years’ experience teaching writing to kids, university students, and adult learners. It includes ideas and exercises that teachers and students can use in the classroom, and creative writers can use to level up their process.
OK. We’ve talked about how to take notes and how to track our sources, either manually or using a reference manager. Today I’m going to discuss another fabulous app for writers: Scrivener. The combination of Endnote (reference manager) and Scrivener (word processor) is quite literally the best thing that’s ever happened to my writing process.
EVER.
That being said, unless you are a university student, an academic, or a professional writer, you do NOT need to invest time in figuring out how to use Scrivener. Stick with Word or Pages or whatever else you already use. Scrivener has a steep learning curve and unless you’re going to be using it a lot, you should spare yourself the frustration.
If you ARE going to be using it a lot, there are great help videos online. Scrivener for Dummies is pretty great, too. For today’s purposes, I’m going to walk you through the basics of how I set up and manage Scrivener databases for nonfiction projects. You can use this as a template for university research papers, for academic articles, OR for children’s books, as you see fit!
Taking Notes With Scrivener

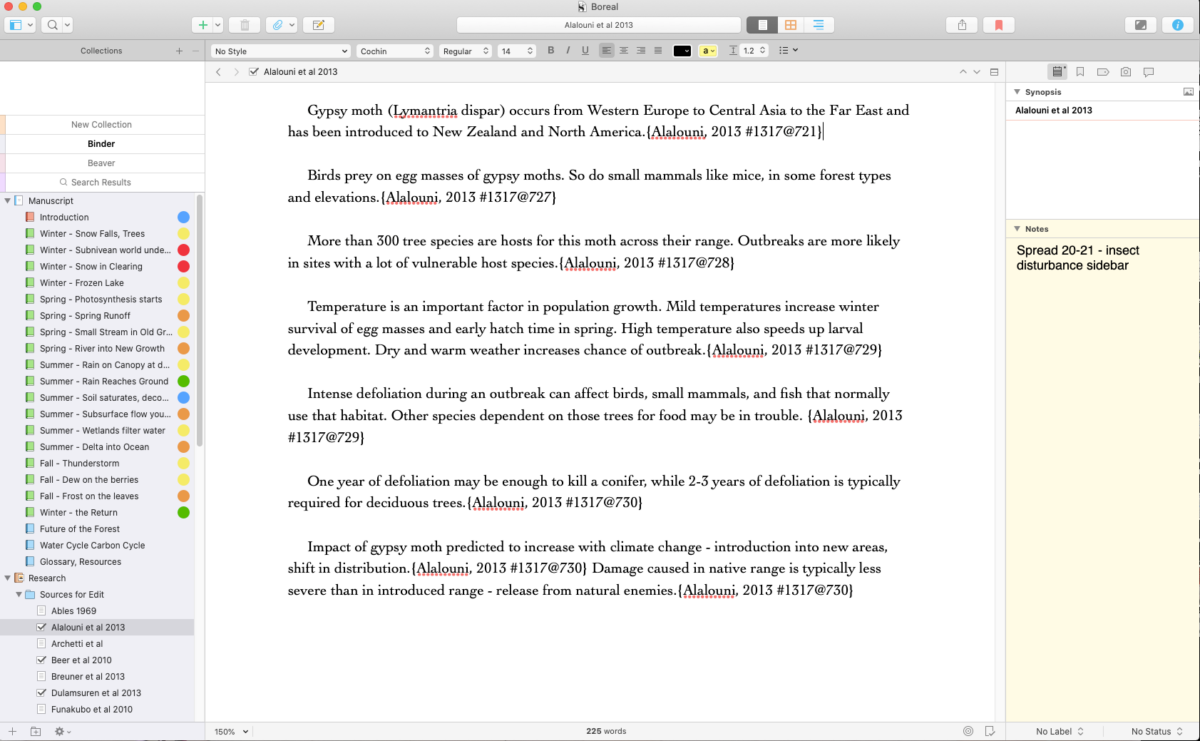
This is a screen capture of my Scrivener database for The Boreal Forest. In the left hand column – The Binder – you’ll see folders and files for the manuscript itself, followed by folders of research.
 The research is what we’re interested in today. Notice that the research folder contains separate files: one file for each source. The contents of the selected file appear in the large central window. This window is where I type my notes as I read through my reference material. Notice that each paragraph is tagged with something that looks like this:
{Alalouni, 2013 #1317@721}
Remember how I said to tag each fact with a note about its origin? Well, that funky-looking text is what’s known as an Endnote field code. That code tells my reference manager which source out of the 1800+ in my database that fact came from… and I’ve edited the field code to include the precise page I was looking at when I typed the note. This is the magic code that will allow Endnote to format my citations and bibliography for me when the project is done (more on that next time).
Organizing Research With Scrivener
Scrivener offers a LOT of cool features to help you track and organize your research. You can:
- use labels to colour code files for different subtopics
- add keywords and other custom metadata to each notes file
- add comments on the content or notes and reminders
- update the status of the file… and more…
I don’t use all of these features… or rather, I start using them with good intentions and then forget to keep it up halfway through the project. Your mileage may vary.
One feature that’s been consistently helpful for me, is the ability to change the icon of each file. For example, I use the check mark to show that I’ve already copied notes from that source into my outline. I also like the warning icon, which I use for sources that I’m not sure are reliable – it reminds me to check my research before I include questionable info in my draft.
Searching Your Research in Scrivener
This feature is THE BEST THING.
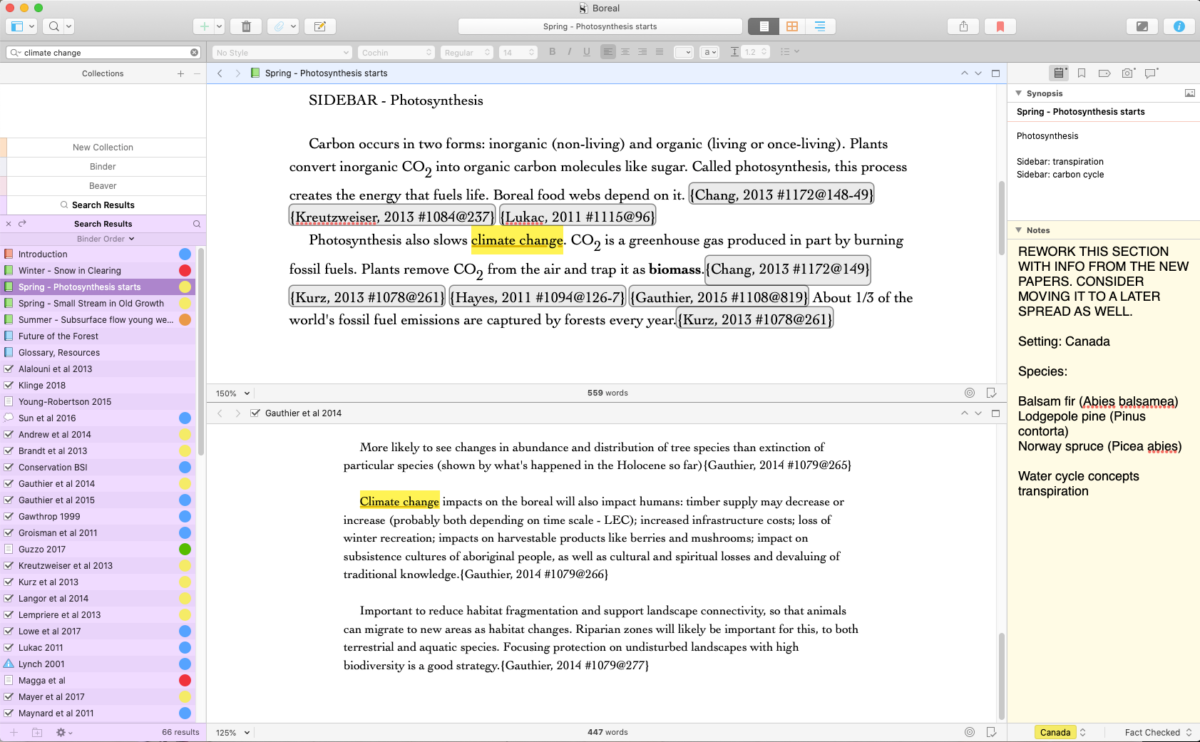
When you type a search term into Scrivener – in the example shown below, I used “climate change” – The Binder generates a list of every single file in your database that contains that term. And it highlights the search term in the text of the file itself.
I love this so much, I can’t even. I use it when:
- I know I’ve read a thing but I don’t remember where
- When I’m drafting and decide to include a new subtopic and need to cull through all my notes for relevant information
- When I start a new project that overlaps with a previous project and I need to identify research I’ve already done so I can copy it into a new Scrivener database.
Also, the Split Screen Feature
Did I mention that you can split the main window into two so that you can compare two files at the same time? Super handy when you are comparing what two sources have to say about the same topic.
I also use it when I outline – as you can see in the screen capture above, the draft files go on top, the research files on the bottom. Then I just I copy/paste. It’s the fastest way to organize notes into an outline that I’ve ever tried. Also very helpful for fact checking purposes, as I compare drafts to notes. More on that in a future column!
Have you tried Scrivener for essays or nonfiction? What’s your favourite feature?
Hey, did you know I teach writing workshops? It’s true – I work with adult writers, teachers, and students of all ages. Contact me to learn more.

Very excited to read this article on how to best use the research section of Scrivener.
You’re welcome! I hope it helps.